How storage works?
Last updated: 09/03/2022
This documentation is under development, therefore it may not be complete or have incorrect information and it will be regularly updated.
In this page, you will find relevant information regarding storage on VMCloud and frequent asked questions regarding storage management.
Background
To further understand how storage works, it is best to explain how VMCloud approaches storage.
There are essentially two types of storage: ephemeral and persistent. Ephemeral disks are associated with instances, meaning they disappear when a instance is deleted, therefore not persistent. These disks are managed by the Compute service (nova).
On the other hand, persistent storage is always available and does not depend on other resources. VMCloud currently offers only one type of persistent storage, which is block storage, managed by the Block Storage service (cinder), known to users as “Volumes”. These can be detached from one instance and re-attached to another, while maintaining data intact.
Either way, you can always create a snapshot of the disk, to have a instant copy of it at a particular time. The following sections show how ephemeral or persistent disks are managed.
How do I manage storage upon instance creation on VMCloud?
In the Source tab in the Launch Instance window, you will find several options:
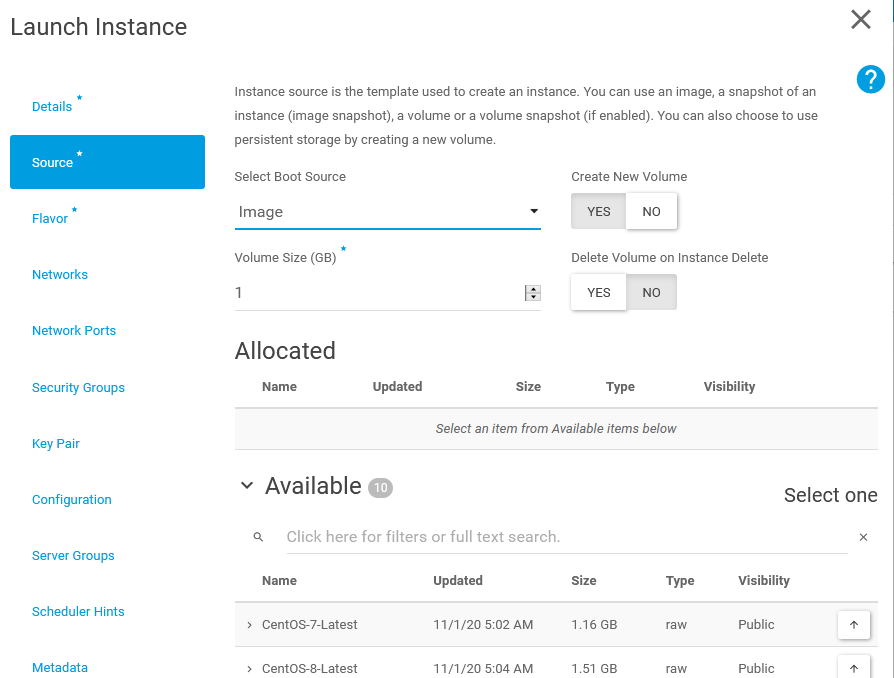
Essentially, if the Create New Volume option is set no No, then a ephemeral disk with the disk size specified in the selected flavor is created and used. This means that the project’s volume quota is not used but you cannot change the size or reuse the disk. Otherwise, only one persistent volume is created and used, which can have the desired size and be reused.
According to what you want to do, there are different procedures:
The flavor disk size is sufficient and the instance data after the VM is deleted is irrelevant
Set the following settings:
Select Boot Source: ImageCreate New Volume: No- Choose the operating system image under the
Availablesection
As explained, this will create an ephemeral disk with the disk size specified in the selected flavor that will be deleted when the instance is deleted. Additionally, your volume quota will not be used.
The flavor disk size is too small
Set the following settings:
Select Boot Source: ImageCreate New Volume: YesVolume Size (GB): (Insert your desired disk size in GB)Delete Volume on Instance Delete:- Yes - if you want to re-use this volume after this instance is deleted.
- No - if the volume will not be reused. This is useful to prevent unused volumes wasting volume quota.
With this setting, a persistent volume will be created and attached to your instance as the main disk, using your project’s volume quota. After the instance is deleted, this volume will be kept or deleted according to the Delete Volume on Instance Delete setting.
I want to keep the instance data after I delete the instance
Set the following settings:
Select Boot Source: ImageCreate New Volume: YesVolume Size (GB): (Insert your desired disk size in GB)Delete Volume on Instance Delete: No
Like the previous answer, a persistent volume will be created and attached to your instance as the main disk, using your project’s volume quota. After the instance is deleted, this volume will be available to be attached to another instance. You can check the created volumes in the Project -> Volumes -> Volumes page.
I already have the instance running, but I want to manage its storage
This is possible of course. But again, according to what you want to do, there are different procedures.
I want to know if the instance disk is a persistent volume
Go to the Instance page (Project -> Compute -> Instance -> [Instance Name]) and check the Overview section, under Volumes Attached.
- If there is no volumes attached, then the instance is using an ephemeral non-persistent disk, therefore it will be deleted when the instance is deleted and it cannot be reused.
- If there is one volume attached on
/dev/vda, then the instance is using a volume as the main disk, therefore it is persistent.- Beware that, if you do not recollect if the
Delete Volume on Instance Deleteoption was used upon instance creation, then also read the next answer if you want to keep the volume.
- Beware that, if you do not recollect if the
I don’t know if I created the instance volume with the Delete Volume on Instance Delete option
Unfortunately, there is no option to check if the volume has this option set. Therefore, if you want to keep this volume, it is best to be safe and do the following procedure before deleting the instance, to make sure the volume is not deleted:
- Go to the instance page, accessed via
Project -> Compute -> Instance -> [Instance Name]. - Check the
Overviewsection, scroll downVolumes Attachedand click on the volume ID. This shall direct to the volume detail page. - Click on the arrow button next to the
Edit Volumebutton on your right and chooseCreate Snapshot. - If the instance is running, you will have a warning regarding snapshot creation. For this procedure, this will not matter. Write a random snapshot name and click on
Create Volume Snapshot/Create Volume Snapshot (Force). - After the snapshot is in the
Availablestatus, you can now delete the instance and the volume will appear asAvailablein theProject -> Volumes -> Volumespage. - (Optional) After deleting the instance, delete the created snapshot, as it is a temporary one and you will need to delete it if you want to delete the volume later on.
The rationale behind this procedure is that this option is saved in the instance’s volume attachment information and currently there is no possibility of modifying this value. So when the instance is deleted, a request is made to delete the volume, however this is not possible if a snapshot of the volume exists, therefore the instance is deleted but not the volume.
What are snapshots?
A snapshot is a mechanism to save instance or volume data on a specific point of time.
On VMCloud, there are two types of snapshots: Volume and Instance. - Volume snapshots can be created from any volume and they are best suited for data volumes, i.e. volumes that are not attached as the main disk on any instance and do not have any operating system data in it. Nevertheless, volume snapshots can be done from volumes used as main disks. - Instance snapshots can be created from any instance, even if they have a volume as their main disk, and they are best suited for saving the data on the main disk on a specific point in time or creating a template image, i.e., an image that contains all the desired software for a specific environment and that will be used to launch many instances.
Volume Snapshot
A volume snapshot is created from a volume and it is handled by the Cinder Volume service. These snapshots can only be used to create new volumes.
On the Project -> Volume page, you can create a snapshot from the options of any of the listed volumes. Beware that creating snapshots from volumes that are in-use is not recommended and may result in corrupt snapshots in some cases. In this scenario, it is better to shutdown the instance before creating the snapshot or, if the volume is the main disk of the instance (also explained on this page), perform a “Instance Snapshot”, explained in the next section.
On the Project -> Volume -> Snapshots page, you can see the created volume snapshots. Each snapshot has the option to create a new volume from it, with a different size if desired, or launch an instance directly from the snapshot, which will create a new volume with the same size of the snapshot and use it as the main disk of the new instance.
Instance Snapshot
An instance snapshot is created from the main disk of an instance and it is handled by the Nova Compute service. The disk can be a volume or an instance disk, i.e. persistent or ephemeral disk. These snapshots will be available as images.
On the Project -> Compute -> Instances page, you can create a snapshot from any instance. Instance snapshots are listed on the Project -> Compute -> Images page with the Snapshot type. These snapshots can be launched in new instances, just like the available operating system images.
I have a 0 size image. What happened?
If a snapshot is listed with 0 size, then this indicates that it was created from an instance with a volume as main disk. In this scenario, a volume snapshot of the volume is created and a 0 size image is created with the information of the volume snapshot.
On the detail page of that image, you can see the block_device_mapping section with the information of the volume snapshot. Also on the Project -> Volume -> Snapshots page, you will see the snapshot with the name snapshot for [IMAGE_NAME], therefore, when an instance is launched with that image, a volume is created from that snapshot and attached to the new instance. If this volume snapshot is deleted, then the image will not work, even though it might be listed.
What about backups?
VMCloud does not offer guaranteed backups on your instance or volume data. Although we have not experienced any loss of data so far, you should beware of it. Like any backup procedure, it should never rely on one location, so to backup your data, create copies of it in different locations.